Backsplash Idea: Faux Stone Re-Finish

The faux-finished backsplash tiles. Photo: JProvey
My wife, Mary Ann, hated the backsplash tiles in our kitchen, and I agreed they were slightly dated. Unfortunately, the crackled glass that we wanted to replace them with was amazingly expensive: $17 per square foot (more than $500 for the 30 sq. ft. that we would need). So I did what any good husband would do—I stalled.
Related:11 Backsplashes for a Unique Kitchen
但是有一天,当她在工作中,我决定do a little experiment. I applied a mixture of primer, glaze and artist’s oils to some spare tiles to see if I could create a faux stone finish that would give the existing tiles a fresh new look—at little to no cost. And it worked!
Here’s a step-by-step of how I created the look:
Step 1:Run a palm sander with a fine, 220-grit disk over the backsplash to roughen up the existing tiles. Clean the surface with a TSP substitute.
Step 2:Using a 6-inch foam roller, apply three coats of pigment shellac-based primer (I can recommendB-I-Nby Zinsser); allow at least 45 minutes dry time between coats.
Step 3:To create the faux, mottled coloration you will need to purchase tubes of artist’s oil paints. I used Payne’s Grey (a bluish grey), Raw Umber, and Zinc White (about $6-$7 per tube) to get my Tuscan stone look. You will also need to purchase a clear alkyd glaze, similar to what you would use to create a faux wall finish (Benjamin Moore’s#409 00 is a good choice at $14 per quart.)

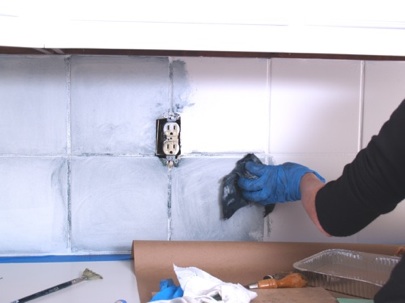
Applying first color-glaze coat on primed tiles. Photo: JProvey
Step 4:In a disposable aluminum tray, mix a quarter-size dollop of the grey oil paint with a half-cup of glaze and test it on a part of the backsplash hidden from view (like behind the range). When you find a mixture that gives you about a 30 percent tint, wipe a coat over the entire backsplash using a cotton rag. Don’t worry about whether some gets on the grout; the joints will be colored.

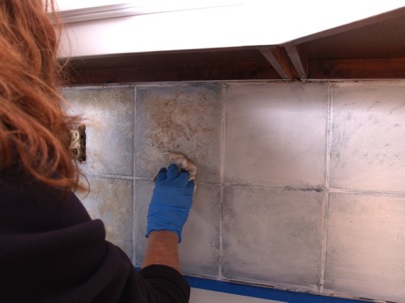
Photo: Joe Provey
Step 5.While the first coat is drying, mix the Raw Umber and glaze in the same ratio as above. Beginning where you started the first coat, apply the umber-glaze mixture with a balled-up rag. Use a stamping motion to allow about 25 percent of the first coat to show through. The folds in the rag will produce the random, mottled look of marble. If you don’t like the way your first attempts look, wipe it off with a rag dampened in turpentine and try again.
Step 6:You can create a stippled look by mixing the grey oil paint and glaze in a 50-50 ratio and apply with an old toothbrush. A fine, thin brush with long bristles will be best for veining.

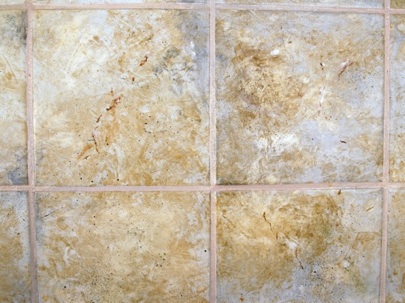
The faux effect you want to imitate. Photo: JProvey
Step 7:The last step is to paint the grout. The product I used—Polyblend’s Grout Renew—is both a colorant and sealer. If you can’t find a premixed color that you like, buy the white and tint it yourself. Use artist’s acrylic paint, not oils, with water-based grout sealer.
The total cost of the project came to about $60, with half of that being a quart of shellac-based primer. Even better, it was done in 5 hours and in time for dinner!
For more on paint and painting techniques, consider the following Bob Vila articles:
Paint Makeovers: An Expert Tells All
Paint Guide: 10 Essentials for Successful House Painting
Color Trends 2012: Top Forecasters Weigh In


